
To quickly and simply create professional videos, use Google's Vids tool
With cutting-edge tools and services designed to make users' everyday tasks easier, Google is eager to keep up with the rapidly growing field of generative artificial intelligence. Even though Google's efforts began with the Gemini robot, they continued to grow and now include other tools like NotebookLM and Deep Research that we have already reviewed.
We are showcasing Google's newest tool to be added to the Google Workspace suite today: "Google Vids."
Thanks to the company's AI-powered technologies, the service is free and accessible to all users, enabling them to create and edit professional videos with ease even if they have no prior video editing experience.
We will go over every detail about this tool below.


This new tool from Google allows users to create interactive visual content without the need for sophisticated video production skills by integrating easily with other Google apps, such as Google Docs and Google Slides. With the help of the artificial intelligence-powered tool, users can easily produce entire videos, complete with background music and images. All users can use the tool for free, and it includes a number of pre-made templates for making videos. Those who have paid plans, such as Google Workspace's Business Standard, can use Gemini to write text that describes the video concept; it will be made entirely without user input.
When you initially use Google Vids, it might appear to be a hybrid of Gemini and Google Slides. The slides in Slides and Vids actually have a lot of the same tools, and the scenes in Vids are comparable. Additionally, you can include the same kinds of media that Slides allows, including GIFs, animations, and transitions.
The distinction is that Vids gives you more choices, enabling you to add new kinds of media, including screen recordings, AI-generated images and videos, audio recordings, and images and videos from public libraries like Pexels and Unsplash. It is crucial to remember that Google Vids is not meant for making movies or extensive video projects, even though it is still a great tool for making presentations and other kinds of content. The following section will provide more clarity on this.

Go to Google Vids' official website and log in with your Google account to begin using the tool. Then, under the "Start a new video" section, tap the "+" symbol. A welcome screen with a number of video production options will appear. Four primary options to assist you in starting your project are located on the left side. However, we have found that you will only see three options if your Google account is set to Arabic. This is due to the fact that Gemini's video creation assistant feature is currently limited to English.
As we previously discussed, the first option, "Help me create," enables you to use Google Gemini to generate a video draft that contains pre-made slides, images, videos, and audio clips based on the user's input. Although this feature is now free in beta, it will eventually only be accessible to Google paid subscribers.

To begin using this option, choose it from the side menu and then write a text message in English explaining the video's concept, goal, target audience, and duration. By adding a @ symbol after the file name, you can also include pertinent Google Drive files. To create a chart for the clip's content, including the introduction, definition, etc., click Next. By clicking on the pen button that corresponds to each element, you can revise and develop this first draft until you achieve the desired outcome, or you can click Try again to start over from scratch.

After that, you must select one of the pre-made video templates, which you can rapidly preview by moving your mouse pointer over them. After you have decided on a particular option, click "Create the draft video." In just a few seconds, Google Vids will produce the video along with an AI-generated script. From here, you can add sound effects, voiceovers, and pre-made or filmed video clips, as well as choose the appropriate scenes from a vast library of images and video clips.

As the name implies, the second option, "Templates," assists you in beginning a project in the event that you are unsure of your exact goals. To utilize and gain inspiration from these templates, select "Templates." There will be about 90 templates available, which can be used to share campaign and event summaries or to present training and educational courses. Generally speaking, select the relevant template and select "Insert all scenes." After that, you have the option to insert every scene or just the one you want by selecting "Insert selected scene." Just like when you edit a Google Slides template, you can begin adding your own elements to the clip editing panel to replace the text and images that are part of the template.

"Record," the third option, is used to record videos. With or without your own image, this is very helpful when demonstrating a product or explaining something. Click Record, then select the recording type that works best for you: audio only, screen and audio, camera only, or camera and screen. To begin recording, click the red Record button. To add it to your project, click it once more after you are done, and then click Insert. Click the Record icon, located at the bottom of the list of icons on the right side of the project editing interface, if you wish to add more recordings.

Finally, the fourth option, "Upload," lets you start the project right away by clicking "Upload" and choosing the file. You can upload multiple media files, such as pictures, videos, GIFs, etc., from your device or the cloud.

We have covered the four main options for adding content to your video, but there are a lot more settings you should be aware of, such as how to add and edit scenes. This can be done by pressing Ctrl + M on Windows or Command + M on Mac, or by clicking the plus sign (+) at the top next to the lens icon.
should also understand how to change a scene's length by dragging the cursor over its edge to make it longer or shorter. Additionally, you can alter the fonts and colors by clicking the Scene section, choosing Styles, and then Customizing Styles. In the Sstyles panel, you can modify the font name's style by clicking the pen icon next to it or by clicking the color icon.

The two overlapping circles icon between the scenes you wish to link makes it simple to add effects or transitions between them. In tSelect the desired transition type from the resulting Transitions panel, and you can also change the transition's duration and speed.
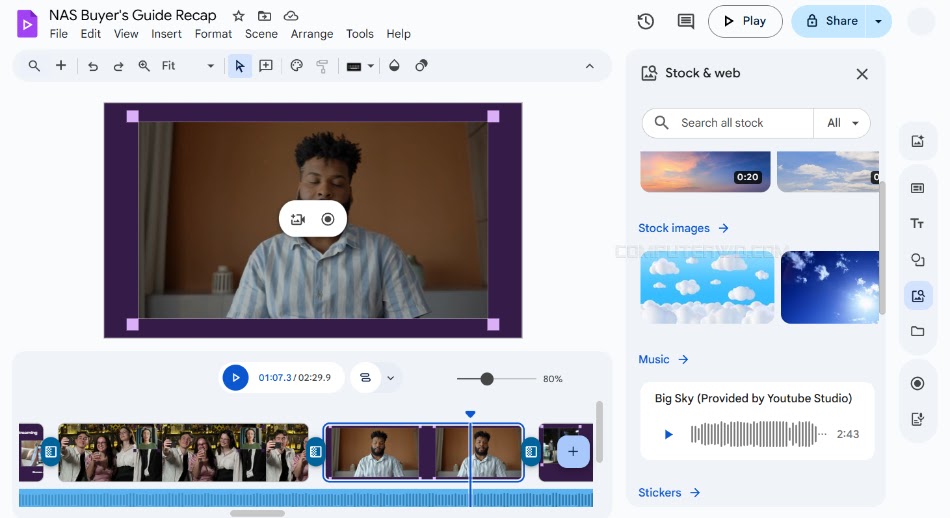
Regarding adding sounds, Google Vids has an integrated audio library with sound effects. To access it, select Music and then tap the Stock & Web icon (the picture icon with a lens cutout on the right). To add the desired audio clip, tap the + icon.
were the key points to remember when using Google Vids. There are many other tools and settings that we'll let you explore after we mention that you can easily share your project after you're finished by clicking the Share button in the top right corner, adding the people or groups you want to share with, and setting their access rights, just as you would in Google Drive, then clicking Send.