How to create a VHD disk to burn and upgrade Windows version without a flash drive
| How to create a VHD disk to burn and upgrade Windows version without a flash drive |
Windows operating systems are among the most widely used operating systems in the world, providing a flexible and suitable working environment for various uses, from personal to business. With the rapid technological advancement, it becomes necessary to install or upgrade the system periodically to benefit from new features and improved performance.
Installing Windows involves setting up the system from scratch, giving users a fresh and updated experience. Upgrading, on the other hand, is a way to maintain the current system while keeping it updated with the latest features and improvements, saving users the need to reset their settings.
Through this topic, we will review the steps to create a partition or VHD disk through which you can burn a copy of Windows and also update any copy of Windows , especially for those who want to upgrade from Windows 10 to 11 and the latest update 24H2 .
What is a VHD disk?
VHD (Virtual Hard Disk) is a file format used to store hard disk data in a virtual form. VHD is mainly used in virtualization environments, such as Microsoft Hyper-V and VirtualBox, where it allows running virtual operating systems or storing files independently of the main system.
Common uses:
Software development :
- It is used by developers to test applications in different environments without having to install multiple operating systems.
Testing and development :
- Used to test new operating systems or software in isolated environments.
Backup :
- It is used as a means of storing data in an organized and orderly manner.
Install and burn Windows:
- This format can be used for burning Windows and upgrading instead of other storage media such as flash memory.
VHD Features:
Save Space : VHD can help reduce the use of physical space on the hard disk by storing multiple operating systems or applications in individual files.
Flexibility : VHD allows different operating systems to run on the same machine without having to format the hard drive, making it easier to test new software or configurations.
Virtual Machine Compatibility : VHD can be used in many virtual machine software such as Hyper-V and VirtualBox, making it an ideal choice for testing and development environments.
Easy Backup : VHD files can be easily backed up, making it easy to manage and restore backups when needed.
Good performance : VHDs often perform well in running operating systems and applications compared to some other storage options.
Easy Management : Many tools and software provide easy interfaces for VHD management, making them easy to set up and use.
Dynamic Size Support : The VHD can dynamically change size to fit data needs, which means it will not take up more space than necessary.
Steps to create a VHD partition:
Creating a VHD disk is done from the main disk on which the Windows version is installed, which is usually partition C, without any programs or utilities.
First, right click on the Start menu and from the menu choose "Disk Management" or "Disk Management" depending on the language.
After opening the Disk Management window, then "Action" and from the drop-down menu choose the third option or "Creat VHD" in English, a window will pop up, click "Parcourir" or "Browse" depending on the language
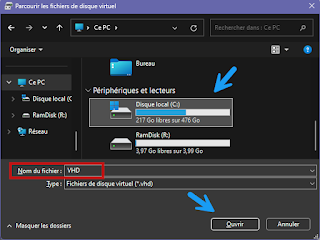
A window will pop up to browse your computer, go to partition C, click once on partition C, and from the "File Name" or "File Name" field depending on the language, type "VHDUSB" then click once on partition C again, then continue "Ouvrir" or "Open" depending on the language, you will be asked to re-type "VHDUSB" again in the same field and continue "Save", then select the size type "GB" and write the disk space, it is best not to exceed 16 GB, and 8 GB is sufficient for the purpose, then continue Ok to create and save the new disk 
Notice in the Disk Management window, the new VHD disk has been created, and also go to the C partition and you will see that the new disk has been created.
Now, right click on the disk icon then the first option, a window will pop up leave everything as it is and continue Ok
Right click again on the disk space, then the first option, a window will pop up "Next" depending on the language
Continue "Next" Leave all settings as they are then "Terminer" or "Finish" depending on the language
Here you have finished creating a bootable VHD disk, you can use it instead of a flash drive to burn and install Windows with "Rufus" and also upgrade.
The explanation is over. Good luck to everyone.


