Solve the problem Some settings are managed by your organization | Final solution

Windows 7 has been one of the best and most user-friendly operating systems from Microsoft. But nothing lasts forever. To get the new features, improvements, and the ability to run modern programs and games, you must definitely upgrade to Windows 10.
The most important new feature in Windows is the Settings Menu, which gives you the ability to adjust and customize many operating system settings without having to open the Control Panel.
This app is supposed to let you tweak and change most of the system settings, including network tools, system updates, access to your personal account and connections, even set a wallpaper and much more.
However, when you change some settings, you may be surprised by a red error message at the top of the settings panel that says: “Some settings are managed by your organization.”
This means that you will not be able to change or modify the settings normally, so what is the cause of this problem and how to get rid of it. In fact, the main reason for this problem is upgrading from Windows 8.1 to Windows 10 directly without reinstalling Windows 10 from scratch, as this problem has been reported by a large number of users as soon as they upgraded directly from Windows 8.0/8.1 to Windows 10.
This issue means that some settings are restricted by your organization. Unfortunately, this issue occurs if the Windows options and settings are not correct during the upgrade to Windows 10, which deprives you of the ability to access some features of the Settings app. So, let us show you how to fix this issue without having to reinstall Windows 10 again.
First: Modify Group Policy to solve the problem Some settings are managed by your organization
The Group Policy Editor is available on most editions of Windows 10, including Professional, Education, and Enterprise, but it is not available on the Home edition, although there is a way to add it on this edition, but it is outside the scope of our main topic.
The idea behind the Group Policy Editor is to modify and configure some operating system settings as organizations and businesses see fit for employees or students. We have already explained how to use it to permanently disable Microsoft Defender on Windows 10 and 11. So, we can modify the usage policy from the Group Policy Editor to see if it is possible to unlock the restrictions imposed by the operating system on the settings.

- Now click on the Windows logo icon from the taskbar or by clicking on Windows + S shortcut .
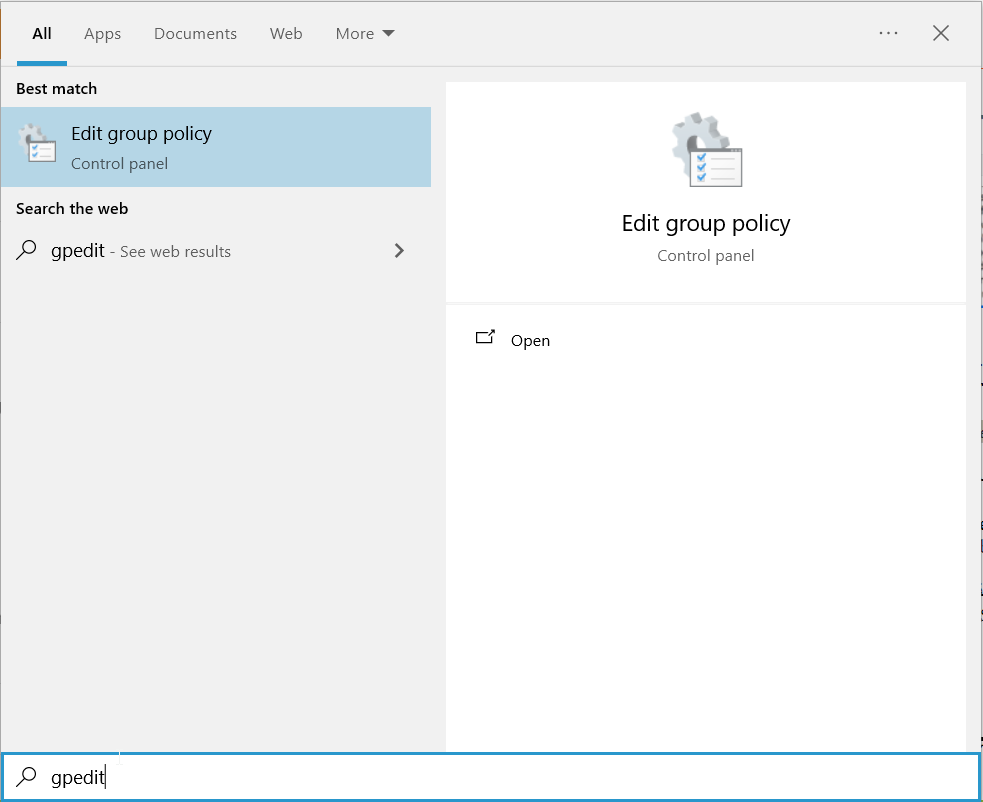
- Search for gpedit.msc and the first result will be “ Edit Group Policy ”.

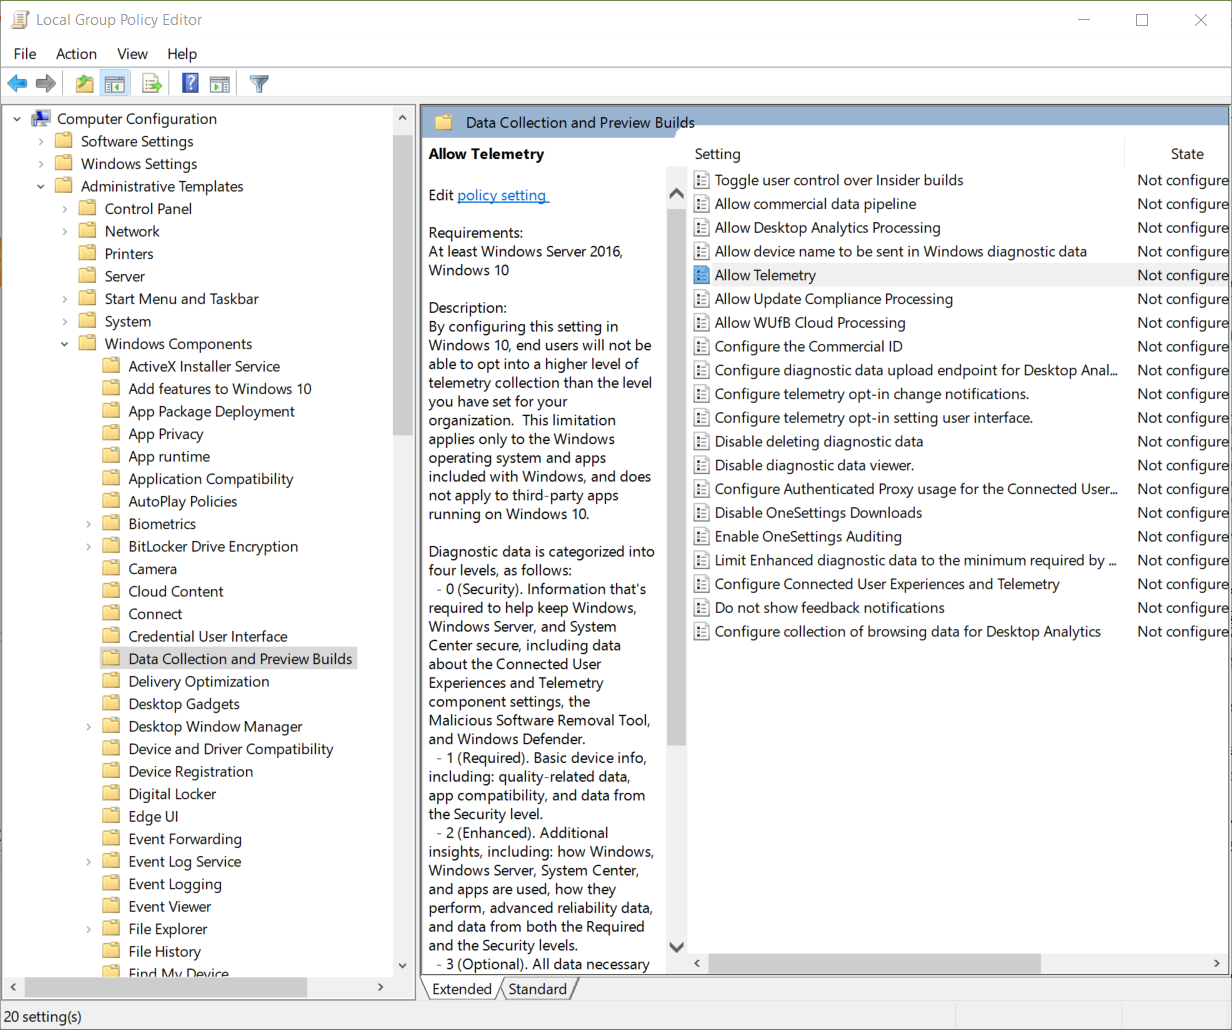
- Open the Group Policy Editor and navigate to the following path:
- Computer Configuration/Administrative Templates/Windows Components/Data Collection and Preview Build
- You can go to this path by manually navigating to it through the options available on the left of the editor window – whichever one suits you best, you can stick with it.

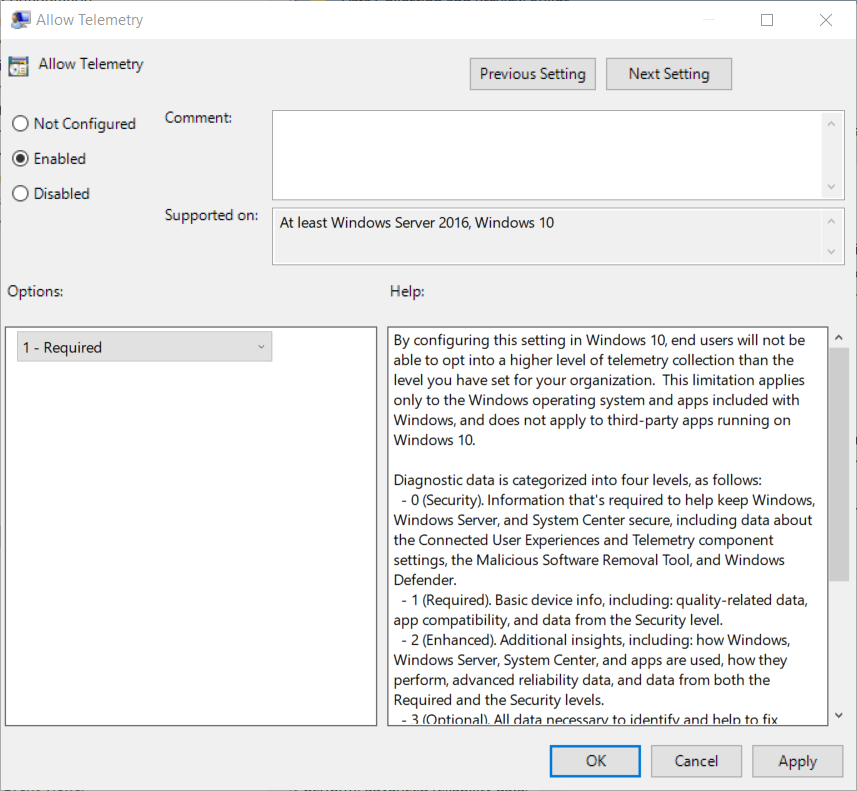
- After reaching the path in question, double-click on the Allow Telemetry option on the right of the editor window.
- Then change the setting to Enabled instead of Not Configured or Disabled.

- Then click Apply and then Ok to save the changes.
- Then open the same option again and choose Not Configured , then click Apply and then Ok .

- Restart your computer and check the Settings app, if the restrictions still persist, you can try the following solutions.
Second: Grant access to the Settings app features manually
If you were able to partially solve the problem through the previous method, but there are still some settings that are prohibited to use within the settings, we will have to grant the sub-settings access manually one by one as we will explain now:
1- Windows updates

- Run Group Policy Editor as administrator.
- Then go to the next path in the same way you did in the previous paragraph:
- Computer Configuration/ Administrative Templates/ Windows Components/ Windows Update
- Then search inside for the Configure Automatic Updates option and double-click on it.
- Now, make sure that this feature is set to “ Not Configured ” and then click on Apply .
2- Home screen and lock screen wallpaper

- From within the Group Policy Editor, navigate to the following path:
- Computer Configuration/ Administrative Templates/ Control Panel/ Personalization
- Then click on the Prevent changing start menu background option twice in a row.
- Then set the policy of this feature to " Not Configured " or " Disabled " and then click Apply .
- Do the same for Prevent changing lock screen and logon image.
3- Notifications to solve the problem of not opening settings in Windows 10

- From within the Group Policy Editor also navigate to this path:
- User Configuration/ Administrative Templates/ Start Menu and Taskbar/ Notifications
- Now start searching for the option Turn off toast notifications on the lock screen.
- Change the property setting to Not Configured or Disabled and then click Apply .
Third: Modify the registry records to solve the problem of your organization managing some Windows 10 settings
Although we do not prefer to fiddle with the registry records , necessity dictates. It is possible to modify some registry settings very precisely to fix this problem. But before starting, we recommend that you make a backup copy of the registry to restore it in case you encounter problems. Just follow these steps:
- Open the Run menu by clicking Win + R shortcut .
- Type regedit in the empty box and then click Ok .
- Go to the following path:
- Computer\HKEY_CURRENT_USER\Software\Policies\Microsoft\Windows\CurrentVersion\PushNotifications

- You can copy the path and paste it at the top of the registry or navigate to it manually.
- On the right of the screen you will find an option called NoToastApplicationNotification, click on it to change its settings.
- If you do not find the option, right-click, then choose New, then DWORD (32-bit) Value, then name the file NoToastApplicationNotification, then open the file.

- Change the value of this option from "1" to " 0 " and then click Ok to save the change.
- Restart your computer or sign out of your Microsoft Windows account and then sign back in again.
Fourth: Change the settings of notes and diagnostics

It is possible that the user's access to some features of the Settings app is restricted due to the operating system blocking the personalization settings. You can follow the following solution to overcome the issue:
- Open the Settings app .
- Look for the " Privacy " option.
- Then choose the first result Privacy Settings .
- Search for Feedback and Diagnostics and change the permissions from Basic to Full as shown in the previous image.
- It is recommended to restart your computer.
Fifth: Verify third-party applications and programs
Some antivirus and antimalware programs have the right to automatically change user profile settings, which may cause some Windows features or tools to be disabled. All you need to do is open your antivirus program and look for a tab called Profile and then temporarily disable it to check if this is the cause of the problem.
Sixth: Modify system properties
There is an option in the Control Panel settings that allows you to modify the system properties to disable the computer as a dedicated enterprise device. Although we cannot guarantee that this is the ultimate solution to this problem, it may work in some cases.
- Open Control Panel .
- Go to System option .
- Then click on the Advanced System Settings link .
- The Properties Settings screen will appear .
- Select the Computer Name tab from the top and then from this window click the Network ID button .
- Then enable the option This is a home computer; it's not part of a business network as shown in the previous example image.
- Confirm your choice by clicking Next and then Ok .
Seventh: Modify all registry records at once.
This problem is usually caused by corrupted or modified registry files. Therefore, it is difficult to pinpoint the exact location of the problem in this sea of registry entries. The only solution you have is to download the registry files in batch from the link provided below and then install them on your computer to replace the old registry entries.
Eighth: Set Group Policy Editor settings to default
If you still have no luck in getting rid of this issue, you can try one last solution which is to restore all the Group Policy Editor configuration settings to default. However, we recommend that you create a System Restore point before you start this attempt.
- Open the Group Policy Editor .
- Go to the following path:
- Local Computer Policy > Computer Configuration > Administrative Templates > All Settings
- Then on the right side of the window click on the State tab to show the configurations that are enabled or disabled separately.
- Now change all the options in this window to Not configured .
- It is indeed a tedious task but it can be an effective solution in most cases.
- You will need to repeat the same process with the following path configuration files and settings:
- Local Computer Policy > User Configuration > Administrative Templates > All Settings
- After finishing the modification, restart your computer and check the result.


