
How to Prevent Windows 7, 8, or 10 from Automatically Connecting to Wi-Fi

If you have a laptop or desktop computer with a USB Wi-Fi device to connect to the Internet wirelessly, you may have noticed that after connecting to the wireless network, Windows saves the connection data for this network, and thus can connect to it automatically whenever possible so that you do not have to type the Wi-Fi password every time you want to connect to this network on the same device.
However, in Windows 10, you can test the system by stopping it from automatically connecting to certain networks. Windows will still remember the password for that network, as well as other connection details, but it will only connect when you manually initiate the connection.
This is useful in many cases, for example, if you don't always want to automatically connect to public Wi-Fi networks that you've previously connected to, especially if these networks require you to log in or offer slow internet speed.
So, through this article, learn the steps that will help you prevent Windows from automatically connecting to Wi-Fi, whether you are using Windows 7, 8, or 10.
Prevent automatic Wi-Fi connection on Windows 10

To stop Windows 10 from automatically connecting to a specific Wi-Fi network in the future, you can simply prompt Windows to do so during the network connection process.
After you open the list of available Wi-Fi networks by clicking on the "Wi-Fi" icon on the taskbar, select the Wi-Fi network from the list, then deselect the "Connect automatically" option and click the "Connect" button. After that, Windows will connect to this network normally, but later it will not connect to it automatically even if the network is available for connection.
See also: How to block pornographic sites on all devices via the router

If you are far from the Wi-Fi network that you want to prevent from automatically connecting to at the moment, you will not see the network in the Wi-Fi list and thus the previous method will not work. However, you can still modify the network profile since you have connected to it before and it is saved on the Windows system.
So, head to the Settings app either through the Start menu or by pressing Win + i together, then go to the Network & Internet section and from the side menu click on the “Wi-Fi” page. On the right side, click on the “Manage known networks” option to display a list containing all the previously connected Wi-Fi networks saved on the device.
Now, select the network you want to edit in the list and click on “Properties”. You can use the search box or filter options to find the exact network you are looking for here in case the list is long.
Next, set the “Connect automatically when in range” option to “Off” as shown in the image above. This way, Windows will not connect to the network automatically, but you can connect to the network manually without re-entering the passphrase and other settings.
See also: How to know who is connected to you on the router and disconnect the Internet from those who are intruding on your device
Prevent automatic Wi-Fi connection on Windows 7 or 8

Unfortunately, Windows 7 or 8 doesn’t have an option similar to Windows 10 to prevent automatic Wi-Fi connections. This means that if you have Wi-Fi connection details saved on your device, Windows will automatically connect to it every time.
The only way to prevent Windows from automatically reconnecting to a saved Wi-Fi network is to tell Windows to “forget” that network and remove it from the list of saved networks. This means you’ll have to re-enter that Wi-Fi network’s password and other credentials if you want to connect to it in the future.
To forget a Wi-Fi network on Windows 7, all you have to do is go to Control Panel, click on “View network status and tasks” and then click on “Manage wireless networks” again. After that, right-click on the Wi-Fi network you want to forget and click on “Remove network” from the drop-down menu as shown in the image above.
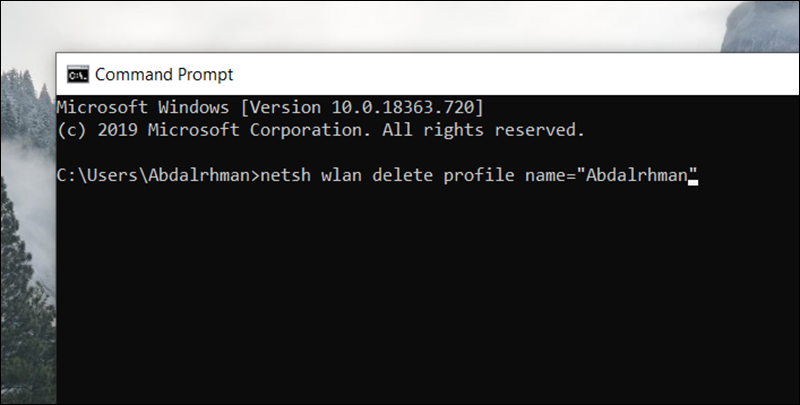
In Windows 8, things are a little different, as there is no easy-to-access menu to view and manage saved Wi-Fi networks. But if you need to “forget” a Wi-Fi network, you have to use the “netsh” command from the command prompt to delete a saved Wi-Fi network.
To do this, open the Command Prompt tool from the Start menu or by typing “cmd” in the search bar and pressing Enter. Then execute the following command, replacing “WiFiName” with the name of your saved Wi-Fi network.
"netsh wlan delete profile name="WiFiName
After running this command, Windows will delete the network from the list of saved Wi-Fi networks, and will not connect to it automatically even if the device is within range of that network.