Disable Microsoft Defender on Windows 10 and 11 permanently

Are you fed up with Windows Defender? Microsoft Defender? Windows Security? Or whatever it is called, and God knows what it will be called in the future. Don't worry, we will show you in this guide how to disable Microsoft software permanently and irrevocably on Windows 10 or Windows 11.
Microsoft Defender is the built-in malware removal tool in Windows to protect against viruses and malware. It’s a good idea and a great way for Microsoft to not get bogged down in buying an expensive antivirus and updating it every year with multiple subscriptions. But how do we convince Microsoft that we don’t need this program? That’s the question.
There are many tools that help us to check that the file is safe from viruses before downloading it to your computer. Unfortunately, Microsoft acts as a trustee of users and knows what is most right for them. We do not doubt the capabilities of Microsoft Defender, but so far it does not rank high among the most popular antivirus programs to the point that we may not be able to abandon it.
There are claims that it is not able to deter new malware and spyware programs. The worst part is that you cannot disable it in an easy and simple way, and even if you disable it from the "Settings" in Windows 10 or even in Windows 11, it will automatically restart itself after a short period of time or as soon as you restart the computer.
Therefore, many of us resort to third-party antivirus programs as they are a safer and more powerful firewall. Then we start to suffer from antivirus programs conflicting with each other, or causing a greater burden on computer resources.
The solution in a nutshell is to disable Microsoft Windows Defender permanently. If temporarily disabling it suits you, we will show you the simple way from the settings.
How to disable Microsoft Defender from settings
Don’t get me wrong, Microsoft is trying to manipulate our minds, and so far, they offer you a way to disable Microsoft Defender, but this will be temporary, unlike all other antivirus programs. So, if the temporary disabling option works for you, let me explain the method before moving on to how to disable it permanently in Windows 10 and Windows 11:
- First open the Settings panel by clicking Win + I shortcut.
- Scroll down and select Privacy & Security from the menu.
- Click on the first option “Windows Security”.
- From the bottom of the Protection areas section, click on the Virus & Thread Protection option.
- The Windows Security window will open.
- Scroll down and click on the “Manage Settings” link.
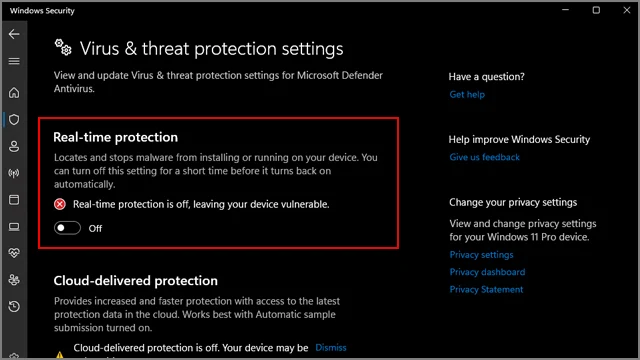
- Now from the bottom of Real-Time Protection disable the feature by moving the slider so that it turns gray.
- Agree to the pop-up message by clicking "Yes".
This way you have temporarily disabled Windows Defender. It will be automatically activated after a short period of time and will still be able to protect you while you are on the web.
From this same window you can disable all the protection features that you should disable. Note that when using a third-party antivirus, it is possible that you will discover that the settings we just explained are not present, which makes disabling it completely the only suitable option and a sure solution to satisfy all parties.
How to disable Microsoft Defender permanently
Yes, there is a way to disable Microsoft Defender completely. But are you fully prepared? I mean, your device without an antivirus will be vulnerable to viruses, especially if you are used to downloading programs from untrusted sources.
So, be prepared for this risk and make sure that you are safe while you are online by using one of the top 5 antivirus programs for your computer . In this case, you will have two options: The simplest option is that there are some third-party antivirus programs that allow you to disable Microsoft Defender completely. The other solution is to play around a little with the registry records.
This trick, which we will learn about shortly, is available on Pro, Enterprise, Education, and Home versions of Windows 10 or 11. However, the trick in which we use Group Policy is not available on Home versions, although it is the easiest, and we recommend it if you are not on the Home version.
Just make sure to disable Tamper Protection from the same Windows Security settings window as we explained in the previous paragraph. Here's how again:
- Open the Settings panel .
- Click on the Privacy & Security option .
- From the bottom of the Protection areas section , click on the Virus & Thread Protection option .
- The Windows Security window will open .
- Scroll down and click on the “ Manage Settings ” link.
- Now scroll down and disable Tamper protection feature .
- By disabling this feature you ensure that the program will not be automatically activated after you restart your computer.
- Then click on Win + R shortcut to open Run menu.
- In the Run menu, type regedit and then click the Ok button .
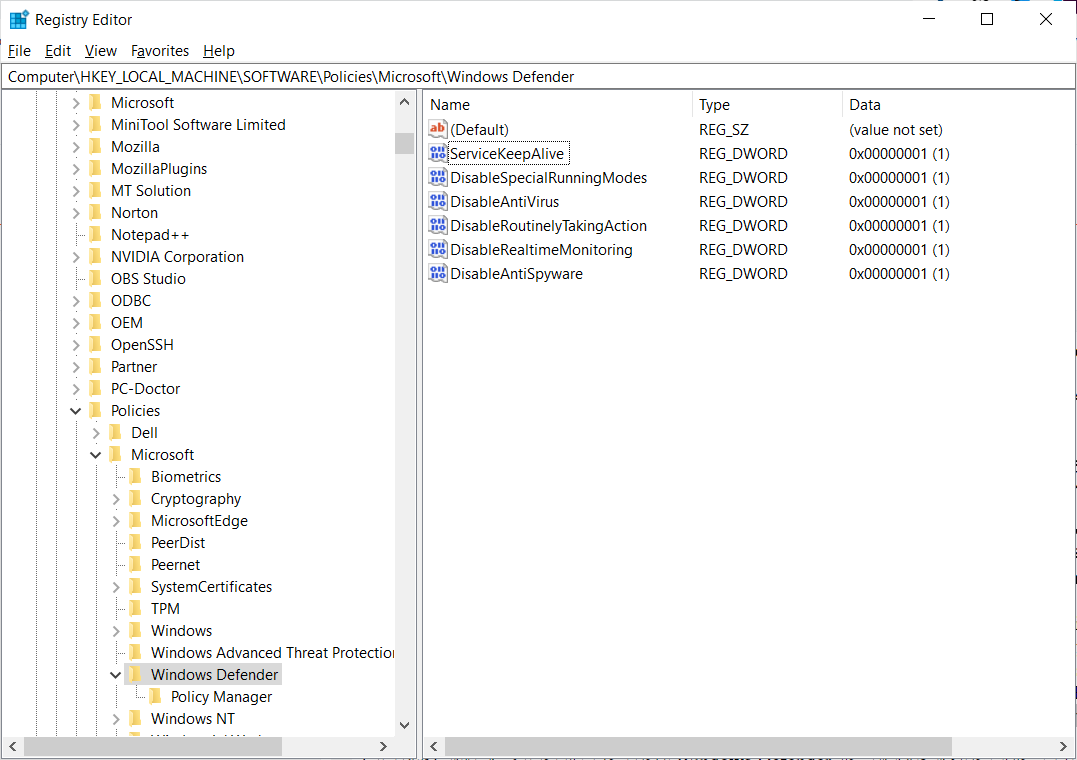
- Once the Registry Records window opens, navigate to this path: HKEY_LOCAL_MACHINE\SOFTWARE\Policies\Microsoft\Windows Defender
- You can navigate to the path manually or copy and paste it at the top of the registry files window as shown in the previous image.
- Do not try to click on the " Policy Manager " folder.
- Just make sure to select the “ Windows Defender ” folder as shown in the previous image.
- Now, in the empty white space on the right side of the screen, right-click.
- Hover over New and select DWORD (32-bit) Value from the menu .
- Right-click on this new file, select “ Rename ” and rename it to DisableAntiSpyware .
- Then right click on this file and choose " Modify ".

- In the " Value Date " field, put the value 1 and then click the Ok button .
- In this way, you have been able to disable Microsoft Defender permanently. However, if you want to reactivate it again, all you have to do is reset the value to 0 instead of 1 in the "Value Data" field.
If you later try to open Microsoft Defender from Settings, you will see an error message telling you that the program has been disabled by group policies.

If you want to disable all protection features associated with Microsoft Defender in Windows 10 and Windows 11, you will need to create a new DWORD value - in the same way - inside the Windows registry in the same folder and previous path by following the same steps that we explained a little while ago and as you did with the DisableAntiSpyware value, you will create new values with the following names and values:
DisableRealtimeMonitoring < Set Value Data to 1
DisableRoutinelyTakingAction < Set Value Data to 1
DisableAntiVirus Set Value Data to 1
DisableSpecialRunningModes Set Value Data to 1
ServiceKeepAlive Set Value Data to 1
The final shape of the folder will be as follows:
You may need to create three new subfolders under the Windows Defender folder in the registry. Right-click on the Windows Defender folder, select New , then Key , and start adding three new Keys as follows:
Signature Updates و Real-Time Protection و Spynet
Then add the following DWORD values to the folders located in the following paths:
HKEY_LOCAL_MACHINE\SOFTWARE\Policies\Microsoft\Windows Defender\Signature Updates
ForceUpdateFromMU < Set Value Data to 0
HKEY_LOCAL_MACHINE\SOFTWARE\Policies\Microsoft\WindowsDefender\Real-Time Protection
DisableRealtimeMonitoring < Set Value Data to 1
DisableOnAccessProtection < Set Value Data to 1
DisableBehaviorMonitoring < Set Value Data to 1
DisableScanOnRealtimeEnable < Set Value Data to 1
HKEY_LOCAL_MACHINE\SOFTWARE\Policies\Microsoft\Windows Defender\Spynet
DisableBlockAtFirstSeen Set Value Data to 1
So the final view will be like this, God willing.
Disable Windows Defender from Group Policy
There is another way to disable Microsoft Defender through the Windows Group Policy Editor which unfortunately is not available on the Home edition of Windows. But if you are using Windows Pro you can follow these steps:
- Click Win + R shortcut to open the Run menu.
- Type the following command: gpedit.msc and then click Ok .
- On the right side of the window, click Computer Configuration , then Administrative Templates .
- Click on Windows Components and then scroll down to the Windows Defender (Antivirus) folder.
- Scroll down to Turn off Windows Defender and click to open it.
- From this window, activate this service by making it " Enabled ". In this way, you are asking the group editor to activate the feature (disable the default antivirus).
Use an external antivirus
There is still an additional way to restrict Microsoft Defender services, which is by installing a third-party antivirus and activating it as the default program on the computer.
Once you install a third-party antivirus, Microsoft Defender will go into a dormant state.
However, if your third-party antivirus doesn't have a firewall, Microsoft Defender will still be ready to offer its services.
To make sure that the third-party antivirus services are enabled, go to Settings.
- Click on the Privacy & Security option .
- From the bottom of the Protection areas section, click on the Virus & Thread Protection option .
- The Windows Security window will open .
- Scroll down and click on the “ Manage Settings ” link.
- Select the Open Windows Security option and then look for the Manage providers link in the next window .
- You may find this link on the right side of the window or in the middle.
- Make sure your third-party antivirus is enabled and Microsoft Defender is idle.
Then go to Virus & threat protection or Open Windows Security and look for Microsoft Defender Options and disable it to make Microsoft Defender completely stop scanning the system continuously. You have to do this in Windows 10 and it is supposed to be disabled in Windows 11 by itself.


