

How to fix Windows Cannot Access the Specified Device, Path or File' error
When this error occurs, you cannot run some programs or access some documents, which limits the usefulness of your computer.
So how to resolve the error "The specified device cannot be accessed"? Take a look at some troubleshooting steps you can take below.
1. Launch the app using administrator rights
Some programs, for various reasons, require administrator privileges to perform specific tasks. In fact, in some cases, you may not be able to open them either.
The error "Windows cannot access the specified device, path, or file" can also be a result of this issue. So, if you're looking to fix this error, running the app with administrator rights will be the best option for you. If the problem is due to a lack of administrator privileges, your application will run when these steps are complete.
2. Disable the blocking unwanted apps feature
Blocking unwanted apps is a feature of Windows Security that helps prevent applications and programs with low reputations from running. This feature may cause a "Cannot access the selected device" error when enabled. You can check that blocking unwanted apps is enabled and disabled as follows:
1. Double-click the shield icon (Windows Security) within the system tray area to the right of the taskbar. You may also need to click the small up arrow on the taskbar to see the system tray icons.
2. Select the Application and Browser Control tab in Windows Security.
3. Then click the Reputation-based protection settings link to see more settings.

4. Uncheck the Block apps checkbox if this feature is enabled.

3. Uncheck the "Unblock file" setting.
Sometimes, Windows blocks access to files or folders downloaded from untrusted sources over the Internet, which can cause the error "The selected device cannot be accessed" appears. When this happens, you'll see an Unblock checkbox in the properties window of the affected file. Here's how to uncheck the File Unblock setting:
WARNING: Make sure you trust the source of the file before doing so. If you unblock an infected file, it can damage your computer and cause file loss.
1. Right-click Start (taskbar button) and select the File Explorer option from the list.

2. Open a folder containing the file where the error occurred.
3. Right click on the affected file and select Properties button.

4. Click General if the properties window does not open with this tab by default.
5. Then uncheck the checkbox Unblock selected if you can see it.

6. Select Apply to save the settings of the new file.
7. Click OK to close the file properties window.
4. Edit file permissions
Another reason for the "Cannot access the specified device" error message is insufficient file access permissions. This is something you can fix by editing the permissions of the affected files. So, try modifying the permissions of the affected file as follows:
1. Open the folder containing the file that caused the "Cannot access the specified device" error.
2. Right-click on the affected file and select its Properties option.
3. Select Security in the Properties window.
4. Then select the Windows user account with which you are logged on.
5. Click the "Edit" button.
6. Select your Windows user account in the permissions window that opens.
7. Uncheck all selected Deny permission checkboxes.

8. Select Apply to set the new permission settings.
9. Click the OK button on all windows.
5. Re-create the program shortcut
If the "Unable to access the selected device" error occurs when you try to run a program shortcut, the problem may lie in the shortcut itself. In this case, setting up a new shortcut for the affected program may resolve the problem. Here's how to do it on your computer:
1. Right click on any blank part of the desktop and select New button.
2. Click the shortcut to display the Add Desktop Shortcuts tool.

3. Then click Browse to select the EXE file where the error occurred, then press the OK button.
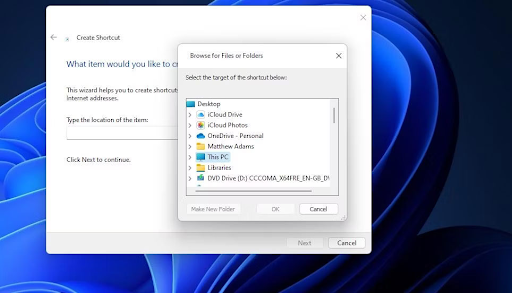
4. Select Next and enter the shortcut title into the text box.
5. Click "Finish" to add a new program shortcut.
6. Right-click on the old program shortcut to select Delete (Trash button in Windows 11).
6. Carefully check the file location
Do you install programs and save some files to an external hard drive or on the network? If so, an access error may occur because the file on the drive is currently inaccessible.
Double-check the location of the files you are trying to play or open by right-clicking on the desktop shortcut and selecting Properties. You can then check the shortcut path in the target box shown below directly.
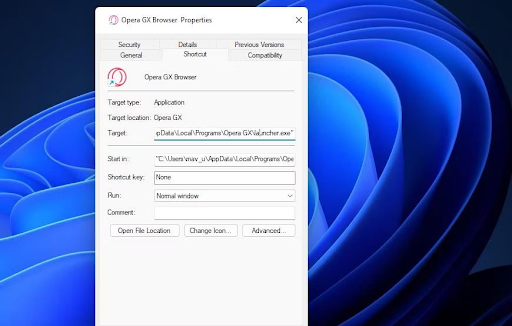
The target box will show whether the file is on another drive or not. If so, connect the external hard drive containing the file to your computer to access the file. Make sure again that the selected file is not deleted if the Target box points to the local C: drive. To do this, open the path of the specified folder in File Explorer.
If you discover that the shortcut file has been deleted, you can recover that file. Open the Recycle Bin to see if the file is there. If so, right-click the file and select Restore .
7. Enable administrator rights with Group Policy Editor
Users have confirmed that enabling administrator consent mode in Group Policy Editor can resolve this file access error. However, Group Policy Editor is only available in Windows 11, Windows 10 Pro, and Enterprise editions. If you can use the Group Policy Editor, try enabling admin consent as follows:
1. Open the Group Policy Editor and select Computer Configuration in the utility.
2. Double-click Windows Settings to expand this configuration category.
3. Then, double-click Security Settings > Local Policies > Security Options in the Group Policy Editor sidebar.

4. Double-click Policy Administrator Approval Mode for the built-in administrator account.
5. Then select the Enabled button.

6. Click "Apply" to set up the policy.
7. Select OK to exit the policy settings window and close the Group Policy Manager utility.
8. Set up affected programs or files to exclude Windows Security
Because Windows Security's blocking actions can cause this error, users must add the affected files to the antivirus application exception list. Doing so will exclude the file from Defender's antivirus. See the TipsMake.com.com guide on how to whitelist files in Microsoft Defender (formerly Windows Defender) for details on how to implement this potential solution.

9. Temporarily disable any active third-party security software
Some third-party antivirus apps share similar app blocking features like Windows Security. Therefore, the alternative security software may also cause the same problem. So, try disabling any third-party antivirus software installed on your computer before you try to run the affected EXE program.

The exact way to disable third-party antivirus applications is slightly different. However, most of them have a context menu that you can select to disable their protection. Right-click on the system tray icon of the antivirus program to see its context menu. Then select an option to disable its antivirus capabilities from there.
If this potential solution works, you'll know why. However, do not turn off your antivirus software, but add the affected files to the security program exception list.
10. Repair or reinstall the file
If you are facing this issue due to a corrupt file, repairing or reinstalling it is the best way. Using the control panel will be your best option in this case. Here's how you can do it:
Go to the search bar on the Start menu, type Control Panel and select the most relevant result.
And from there go to Programs .
Then select Programs and Features.
Right-click on any program and select Uninstall/Change.

Depending on the app, you'll have the option to remove or change its settings. Just follow the on-screen instructions and you'll be done in no time. If you have already installed the app, make sure you downloaded it from a trusted source and then check if you get the same error again.