Resolving Windows 10 Memory Leak Issues: A Comprehensive Guide
1. Restart Your PC:
One of the simplest ways to alleviate memory leak issues is by restarting your PC. This temporarily clears the memory and can help until a more permanent solution is found.
- Open the Start menu on your PC.
- Click the power icon and select "Restart."
2. Utilize Windows Memory Diagnostic:
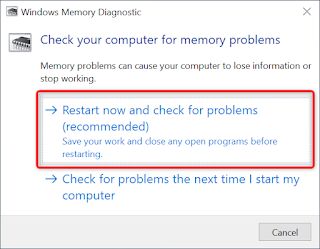
Windows 10 includes a built-in tool called Windows Memory Diagnostic that can help identify and fix memory-related problems.
- Open the Start menu and search for "Windows Memory Diagnostic."
- Select the tool from the search results.
- Choose "Restart now and check for problems (recommended)."
The tool will restart your computer and attempt to fix memory issues automatically.
3. Close Problematic Apps:
Memory leaks often occur due to specific resource-intensive apps that fail to release system resources after use.
- Right-click the Windows taskbar and select "Task Manager."
- Go to the "Processes" tab to see memory usage.
- Identify and right-click on apps consuming excessive memory, then choose "End task."
Repeat this process for each problematic app. If the issue persists, consider uninstalling these apps.
4. Disable Startup Programs:
Some memory leak problems stem from apps launching at startup, consuming memory right from boot.
- Press Windows + I keys to open Windows Settings.
- Select "Apps" and then choose "Startup" from the sidebar.
- Turn off the toggle for each app you don't want to launch at startup.
This prevents unnecessary memory consumption when your PC boots up.
5. Update Device Drivers:
Outdated device drivers can lead to various issues, including memory leaks. Keeping drivers up-to-date is essential for optimal system performance.
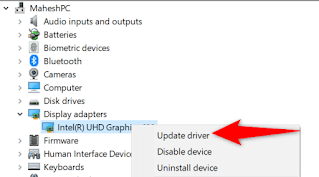
- Open the Start menu, search for "Device Manager," and select it.
- Right-click the device you want to update and choose "Update driver."
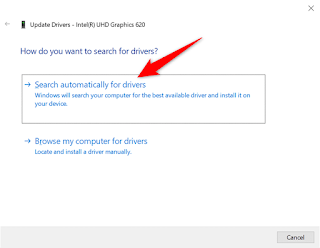
- Opt for "Search automatically for drivers."
Install any available driver updates and restart your PC.
6. Run an Antivirus Scan:
Viruses and malware can hog system resources, causing memory leaks. Use your built-in or third-party antivirus software to scan and remove potential threats.
- Search for "Windows Security" in the Start menu and open the app.
- Choose "Virus & threat protection" and select "Scan options."
- Opt for a "Full scan" and initiate the scan.
Allow the antivirus tool to complete the scan and take necessary actions.
7. Disable Sysmain (Superfetch):
Sysmain, a feature that preloads frequently used apps into memory, can sometimes contribute to memory issues.
- Press Windows + R, type "services.msc," and press Enter.
- Locate "Sysmain," right-click, and select "Stop."
- Right-click again, choose "Properties," set "Startup type" to "Disabled," and click Apply.
This disables Sysmain and prevents it from running on startup.
Conclusion:
Windows 10 memory leak issues can disrupt your workflow and slow down your PC. By following these steps, you can effectively identify, troubleshoot, and resolve memory leaks, ensuring smooth and efficient system performance. Remember to keep your apps and drivers up-to-date, perform regular scans for malware, and manage startup programs to maintain a healthy and optimized system.


