Optimizing Your Samsung Phone's Performance: Clearing Cached Data
Smartphones are incredible tools, but occasionally they can act up—loading sluggishly, crashing unexpectedly, or hogging too much storage space. Thankfully, there's a simple solution that can tackle these issues head-on: clearing your phone's cached data. This article delves into the world of cached data, detailing its purpose, the benefits of clearing it, and guiding Samsung users through the process.
**Understanding Cached Data**
Cached data is a crucial aspect of smartphones, as it involves storing temporary files that allow apps to load swiftly upon subsequent use. Whether it's images from a webpage in Google Chrome or background data from various applications, cached files are intended to expedite user experience.
However, cached files aren't without their drawbacks. Devices across the spectrum, including Microsoft laptops, Apple Macs, iPhones, and Android devices, rely on cached data. The issue arises when these files start to consume valuable storage space, potentially leading to performance hiccups and crashes.
**Unveiling the Magic of Cache Clearing**
The concept of clearing cache is simple yet impactful. By eradicating all temporary files associated with a specific app on your Samsung phone, you free up precious storage space and can potentially resolve issues stemming from corrupted files. One key advantage of this process is that you remain signed in to your apps, with no major disruptions expected. Nevertheless, brace yourself for slightly increased load times, as the app will have to retrieve data from scratch instead of relying on cached resources.
It's worth noting that the cache will naturally accumulate over time as you continue using the app. Cached files are not inherently problematic—in fact, they enhance performance. Therefore, unless performance issues rear their head or you're grappling with limited space, it's often best to let cached data be.
**Mastering the Art of Cache Clearance**
On older Android versions, a single tap could wipe cache files system-wide. Newer iterations, however, require clearing cache files for individual apps. In the realm of Android 12, here's the process:
1. Open your Settings from the home screen.
2. Tap on "Apps."
3. Select the Android app you wish to clear cache for.
4. To identify storage-hungry apps, tap the three horizontal lines in the top-right corner, followed by "Sort by size."
5. Proceed by selecting "Storage."
6. Hit "Clear Cache." Alternatively, "Clear Data" can be tapped, but beware that this restores the app to its default state.
For those on older Android versions, a more streamlined cache clearing process may be available. Visit Settings, navigate to Storage > Cached Data, and follow prompts to delete cache files.
**Simplifying Cache Clearing with Device Care**
Samsung simplifies the cache clearing process with its Device Care app. This utility automatically scans your Samsung phone, optimizing performance by clearing app caches when necessary. It's also equipped to manage battery usage, shut down background apps, and even scan for malware. To get the most out of Device Care:
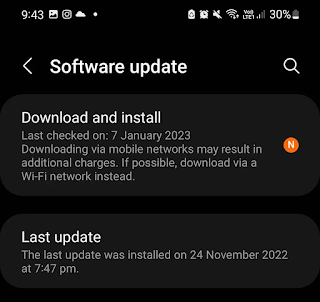
1. Ensure your phone's software is up to date. Navigate to Settings > Software update > Download and install.
2. Complete installation following on-screen instructions.
3. Open Settings, then select "Battery and device care."
4. Tap "Optimize now."
**Strategic Cache Clearing**
Although the urge to clear cached files might be strong, Android phones have a built-in mechanism that automatically clears outdated, unused files from the system. Manually clearing cache files too frequently can backfire, potentially slowing down app performance. As a general rule, only embark on cache clearance when corruption, poor app behavior, or low storage space demand it. Additionally, consider removing cached personal data for added privacy.
By mastering the art of cache clearing, you can keep your Samsung phone performing at its best, ensuring a smoother and more efficient user experience.


