How to reset all sound settings in Windows 11
How to reset all sound settings in Windows 11 To reset all audio devices and sound levels in Windows 11, open Settings and go to System> Sound> Volume Mixer. Find "Reset audio devices and volumes for all apps to recommended default settings" and click the "Reset" button.
If your computer's audio isn't working, or you want to return your audio settings to the default settings so you can recustomize them, it's easy to reset all kinds of audio configurations on your Windows 11 PC. We'll show you how to do it.
Why reset sound settings in Windows 11?
The most common reason to reset audio settings is to fix audio playback issues. Your computer may not play sounds properly, or you may not hear anything at all, which is often caused by misconfigured audio options.
Another reason to reset settings is that you don't want to use custom audio settings anymore. You may have made some adjustments here and there using your audio options, but you want to revert to the default settings. Regardless of the reason, resetting audio settings is easy.
How to reset audio devices and sound levels for all your apps
If you want to reset your audio devices, or return the volume of all your installed apps to default, follow these steps.
Note: Following these steps will expose your hidden audio devices, so you will have to disable these devices again after the reset.
Start by opening Settings with Windows + i. In the left sidebar, select System. In the left pane, select Sound.
Next to "Reset audio devices and audio levels for all apps to recommended defaults," tap Reset.
How to restore default settings for audio devices
If you have problems with a specific audio device on your computer, or you want to bring the settings of a specific audio device to the default settings, the following steps will help you do so.
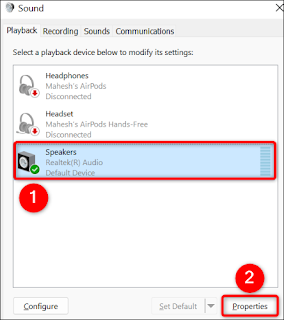
Open Settings by pressing Windows + i. Then head to the System> Sound menu> More sound settings.
In the open window, select your audio device and choose "Properties".
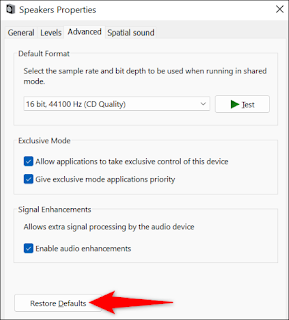
Access the Advanced tab, and at the bottom, click Restore Defaults.
Note: If the Restore Defaults button is disabled, your audio device is already using the default settings.
And you successfully reset your audio equipment.
How to reset Windows system sounds
Windows sounds are the sounds you hear when you receive a notification, an error occurs, or another similar action occurs on your computer. If you've customized these sounds and want to revert to the default settings, it's easy to do.
Open the Start menu and search for Change System Sounds. Select the item with this name.
In the Sound window, click the Sound System drop-down menu and choose Default Windows. Then, at the bottom, select "Apply" followed by "OK".
Your Windows system sounds are now being reset.
Still having audio issues? Try this
If you're resetting your Windows 11 audio settings to fix a specific issue, and none of the above changes resolved your issue, there are a few other things you can try to fix the problem.
Use the Windows Audio troubleshooter
One way to deal with sound problems with your computer is to use the Windows Audio troubleshooter. When you run this tool, it automatically looks for and fixes problems with your audio settings, allowing you to enjoy music on your computer.
To open the troubleshooter, launch the Windows 11 Settings app by pressing Windows + i. Then, in the left sidebar, click System. In the left pane, choose Troubleshooting.
Select "Other troubleshooters."
Restart Windows Audio Services
Windows runs many background audio services so your apps can produce music. When you experience problems with your computer's sound, it's worth restarting these services to resolve your issue. Doing so can fix minor issues with the Services, which may be causing your sound problems.
Start the service restart process by opening the Run dialog box using Windows + R. Type the following in the box and press Enter:
services.msc
In the "Services" window, in the left pane, you will see several Windows services. Here, find the item called "Windows Audio", right-click on it and choose "Restart".
Similarly, find the service named "Windows Audio Endpoint Builder", right-click on it and choose "Restart".
Uninstall and reinstall the audio drivers
If your audio issues persist, your computer's audio drivers might be the cause. In this case, remove the installed drivers and let Windows install the latest drivers for you.
To do this, first, open "Device Manager" by right-clicking on the "Start" menu icon and selecting "Device Manager".
In Device Manager, expand the "Sound, Video and Game Controllers" option. Find your audio device in the expanded list, right-click on it, and choose "Uninstall Device".
In the opened box, enable the option "Try to remove the driver for this device", then select "Uninstall".
When you uninstall your audio device, restart your computer. Do this by opening the Start menu, clicking the Power icon, and selecting Restart.


