How to Fix Brightness Control Not Working on Windows 11 (4 Ways)
If you use Windows 11, you may already know that the operating system is not completely error-free. You will encounter more problems if you use Dev versions of Windows 11, such as the Start menu not working, the sound does not work, the brightness control does not work, etc.
Recently we have received many messages from our readers asking how to fix Windows 11 brightness problems. Users reported that the Windows 11 brightness control is not working, they cannot adjust the brightness of the laptop / computer screen. Moreover, some users have reported that the screen brightness of Windows 11 automatically increases and decreases.
So, if you are using a Windows 11 laptop and are facing the same issue, you are reading the correct guide. In this article, we will share some of the best ways to fix Windows 11 brightness issue with easy steps.
Top 4 Ways to Fix Brightness Control Not Working on Windows 11
Please note that the methods we have shared also work on Windows 10 and other older versions of Windows. This means that you can follow the same methods to fix the brightness and not control the issue of not working in every version of Windows. Let's check.
1) Update the display driver
Well, the display driver is the first one you should update if the brightness control is not working on your Windows 11 computer. Sometimes brightness control doesn't work because of an outdated display driver or buggy.
So, before trying anything else, make sure to update your computer's display driver to fix the Windows 11 brightness control not working issue. Here's how to update your display driver in easy steps.
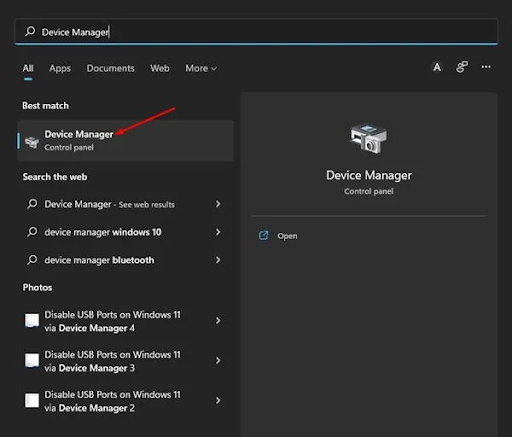
1. First, click the Search Windows 11 button and type Device Manager .
3. Now, right-click on the GPU or display adapter that is running the screen and select the Update Driver option.
Is that him! It's done. Now Windows 11 will automatically check for available updates, and if it finds any, it will install them on your device.
2) Use the Microsoft Basic Display Adapter
Many users have reported fixing the Windows 11 brightness control issue by switching to Microsoft's basic display adapter. If Windows 11 is not compatible with the display driver you are using, you will not be able to control the brightness. Here's how to use Microsoft Basic Display Adapter on Windows 11.
1. First, click the Search Windows 11 button and type Device Manager.
4. On the next screen, click on the option Allow me to choose from the list of device drivers on my computer and select Next.
5. On the Select Device Driver screen, select Microsoft Basic Display Adapter and click the Next button.
Is that him! It's done. After making the above changes, restart your computer. This will most likely fix the Windows 11 brightness control issue not working.
3) Undo screen driver to previous version
If you are having problems with brightness control after installing the system update, you need to roll back the display driver to the previous version.
It is very easy to roll back display drivers to the previous Windows 11 version. Therefore, you need to follow some simple steps shared below.
1. First, click the Search Windows 11 button and type Device Manager .
Is that him! It's done. This is how you can fix the Windows 11 brightness control issue not working on a laptop/computer.
4) Run the SFC command
If all of the above methods fail to fix the issue of brightness not working on Windows 11, then you need to run the SFC command. Often the brightness control does not work or users are not able to adjust the screen brightness as a result of damage to the system files.
The System File Checker or SFC tool will find and repair corrupted system files and potentially fix every brightness issue on your computer. That's what you need to do.
First of all, open the Windows 11 search and type command prompt. Next, right-click on CMD and select Run as administrator.
At the command prompt, type sfc /scannow and press the Enter button.
Now, wait for Windows 11 to complete the scan. Once the scan is complete, close the command prompt and restart the computer.
Is that him! It's done. This is how you can run the SFC command on Windows 11 to fix the brightness control not working.
So, these are some simple ways to fix the Windows 11 brightness control not working issue.


